使用 CSS 锚点定位技术绘制流程图
随着 Chrome 浏览器 125 中引入 CSS 锚点位置 API,将一个元素相对于另一个元素进行定位变得前所未有的简单。这是管理弹出窗口和工具提示等复杂定位用例的绝佳方法。
不过,CSS 锚点定位不仅可用于弹出窗口和工具提示,还可用于创建基本的流程图。在本篇文章中,我们将学习如何使用 CSS 锚点定位来创建流程图和图表。

本篇博文将不涉及锚点定位 API 的全部内容。要深入了解 CSS 锚点定位 API,请查看 Chrome Dev 博客文章《介绍 CSS 锚点定位 API》。
基本定位
CSS 锚点定位是将一个元素相对于另一个元素进行定位的好方法。
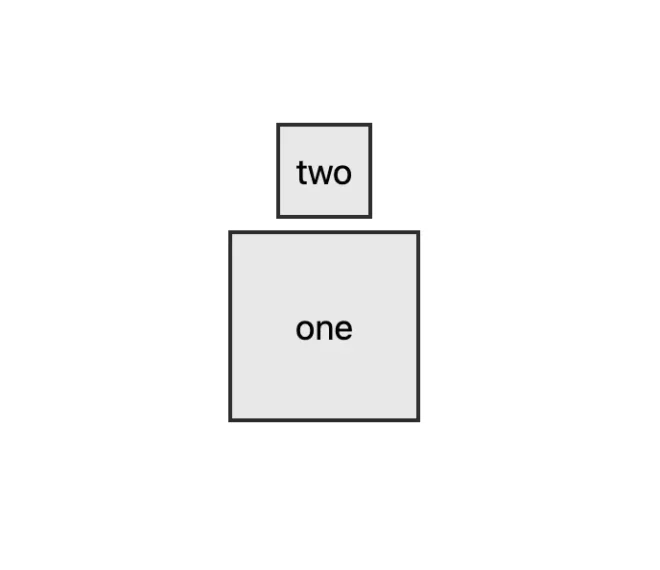
要创建第一个锚点元素,我们需要为 div “one “提供一个名称,以便引用。锚点名称必须是唯一的,并以两个破折号开头 --.
.one {
  anchor-name: --anchor-one;
}
接下来,我们需要为 div “two “提供锚点定位。我们将使用 anchor(--anchor-one top) 将 div “二 “相对于 div “一 “的顶部定位。
.two {
  position-anchor: --anchor-one;
  bottom: anchor(--anchor-one top);
  justify-self: anchor-center;
}
我们使用 anchor(--anchor-one top) 将 div “二 “的底部位置指定到 div “一 “的顶部。我们还使用 justify-self: anchor-center 将 div “二 “相对于 div “一 “水平居中。我们还可以使用相同的语法(上、左、下、右)将 div “two “的任意一侧定位到 div “one “的任意一侧。
多个锚点
通过 CSS 锚点定位,我们可以将一个元素同时锚定到其他两个元素上。

就像 div “一 “一样,我们为 div “二 “指定一个锚点名称,以便新的第三个 div 可以引用。
.one {
  anchor-name: --anchor-one;
}

.two {
  anchor-name: --anchor-two;
}
现在,第三个 div 可以引用锚点一和锚点二进行定位。要将 div “three “定位到 div “one “和 “two “的中心,我们要为元素的每一侧使用 anchor() 函数。我们可以将 div “three “的任意一边定位到 div “one “或 “two “的任意一边。
在本例中,我们使用的是 center而不是边来进行相对定位。这就为锚点创建了重叠效果。
.three {
  top: anchor(--anchor-one center);
  bottom: anchor(--anchor-two center);
  left: anchor(--anchor-one center);
  right: anchor(--anchor-two center);
}
基本流程图节点
利用我们在锚点定位方面的经验,我们可以创建一个基本的流程图。

使用同样的技术,在两个节点之间锚定一个元素,我们就可以通过一些额外的 CSS 技巧来创建类似流程图的效果。

对于第三个 div,我们可以更改背景颜色,使用背景渐变在 div 中间创建线条效果。
.line {
  anchor-name: --line;
  top: anchor(--one center);
  bottom: anchor(--two center);
  left: anchor(--one center);
  right: anchor(--two center);
  position: absolute;
  z-index: -1;
  background: linear-gradient(#2d2d2d, #2d2d2d) no-repeat center/2px 100%;
}
现在我们有了居中定位的线条,可以使用 CSS 伪元素在线条两侧创建箭头。
.line::before {
  position: fixed;
  display: block;
  content: '';
  background: #2d2d2d;
  height: 2px;
}

.line::before {
  bottom: anchor(--one center);
  left: anchor(--one right);
  right: anchor(--line center);
}
然后再在该行的另一侧使用 CSS 伪元素。
.line::before,
.line::after {
  position: fixed;
  display: block;
  content: '';
  background: #2d2d2d;
  height: 2px;
}

.line::before {
  bottom: anchor(--one center);
  left: anchor(--one right);
  right: anchor(--line center);
}

.line::after {
  bottom: anchor(--two center);
  right: anchor(--two left);
  left: anchor(--line center);
}
多节点流程图
这种方法可以通过提供更多节点和链式锚点来扩展。不过,当我们添加额外的线条时,需要根据节点与锚点的相对位置来翻转线条方向。CSS position-try-options 提供了一种简便的方法,当元素无法在所提供的相对于锚点的空间内呈现时,可以声明使用的后备位置。
.line {
  position-try-options: flip-block, flip-inline, flip-block flip-inline;
  ...
}
可拖动流程图
使用一些 JavaScript,我们可以使节点元素可拖动,并创建一个可拖动的流程图。

